> ## Documentation Index
> Fetch the complete documentation index at: https://docs.zavu.dev/llms.txt
> Use this file to discover all available pages before exploring further.
# Email Setup Guide
> Add email as a channel on your sender profile using sandbox or custom domains
Email is configured as a **channel** on a sender profile. You can start testing immediately with a sandbox domain, or add your own custom domain for production.
## Prerequisites
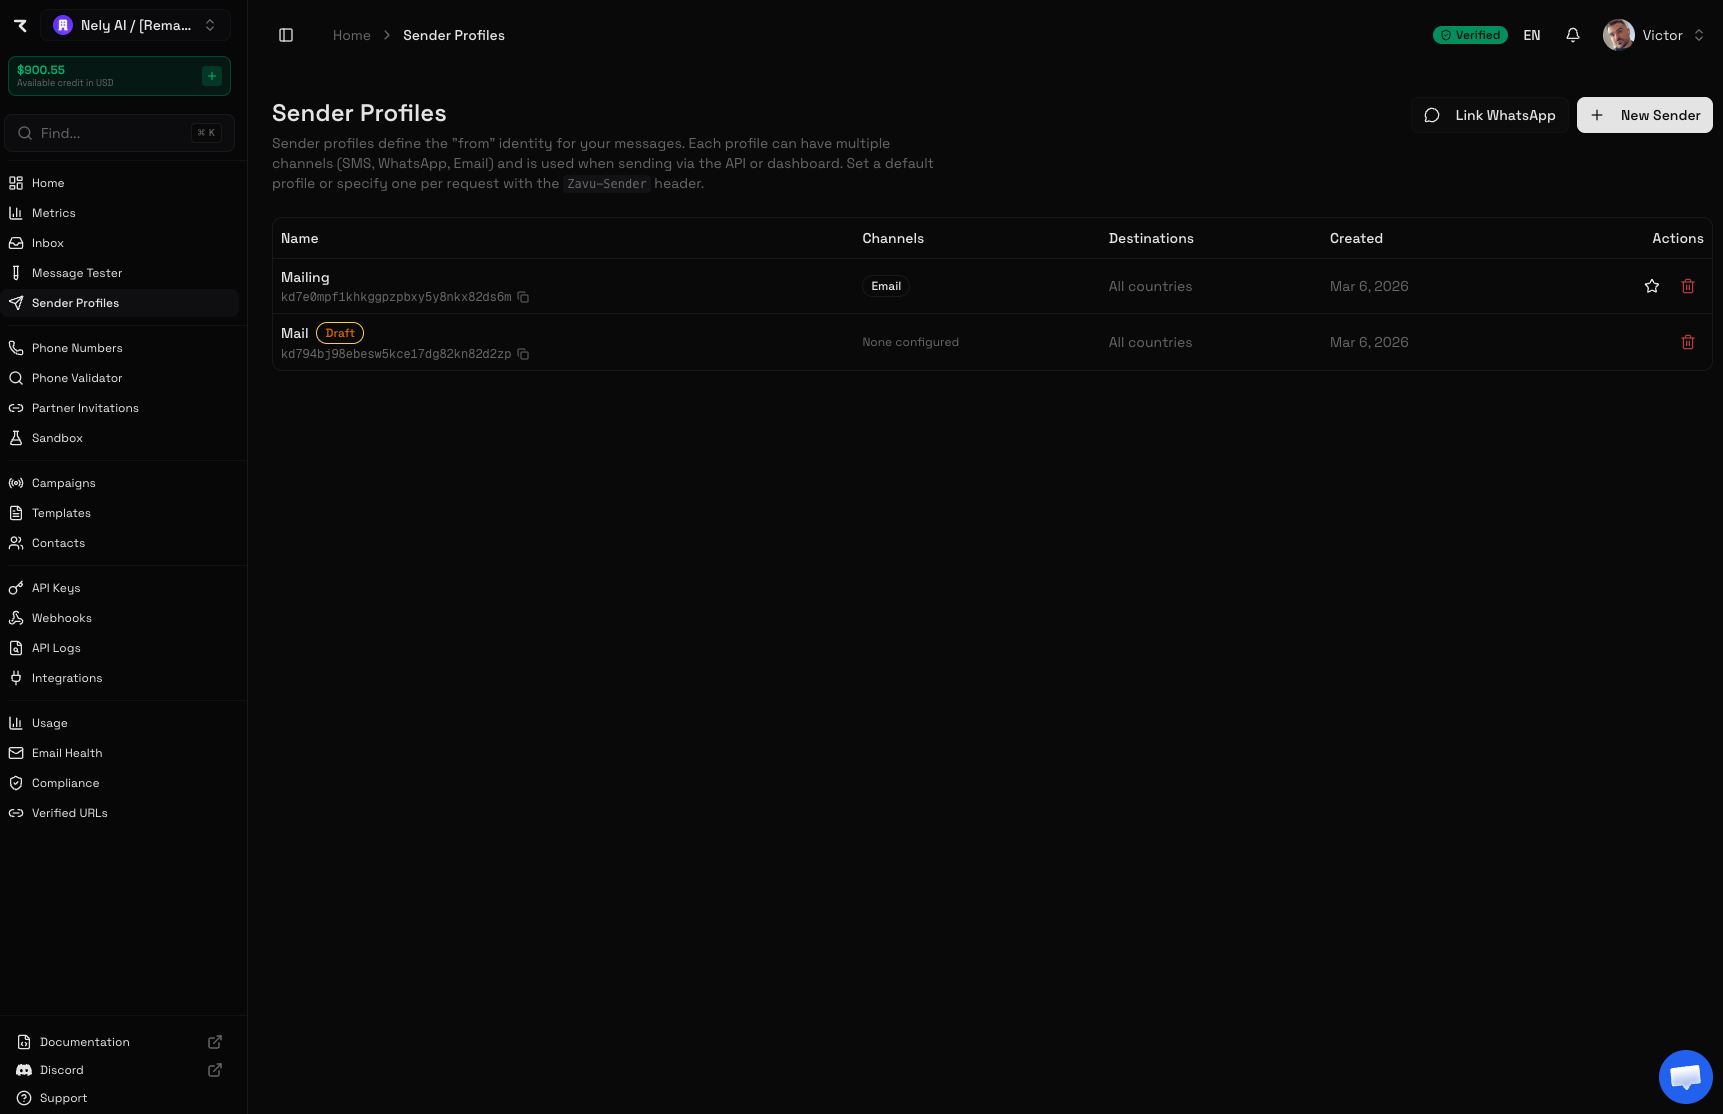
Before setting up email, you need a **sender profile**. If you don't have one yet:
1. Go to **Sender Profiles** in the dashboard
2. Click **New Sender** and give it a name
3. Once created, click on the sender to open its settings
 ***
## Sandbox Email (Quick Start)
Sandbox domains let you test email sending immediately without configuring DNS records.
Sandbox emails are limited to 100 emails/hour. No KYC required. Use a custom domain for production.
Go to **Sender Profiles** and click on the sender you want to configure.
Click the **Channels** tab in the sender detail page.
***
## Sandbox Email (Quick Start)
Sandbox domains let you test email sending immediately without configuring DNS records.
Sandbox emails are limited to 100 emails/hour. No KYC required. Use a custom domain for production.
Go to **Sender Profiles** and click on the sender you want to configure.
Click the **Channels** tab in the sender detail page.
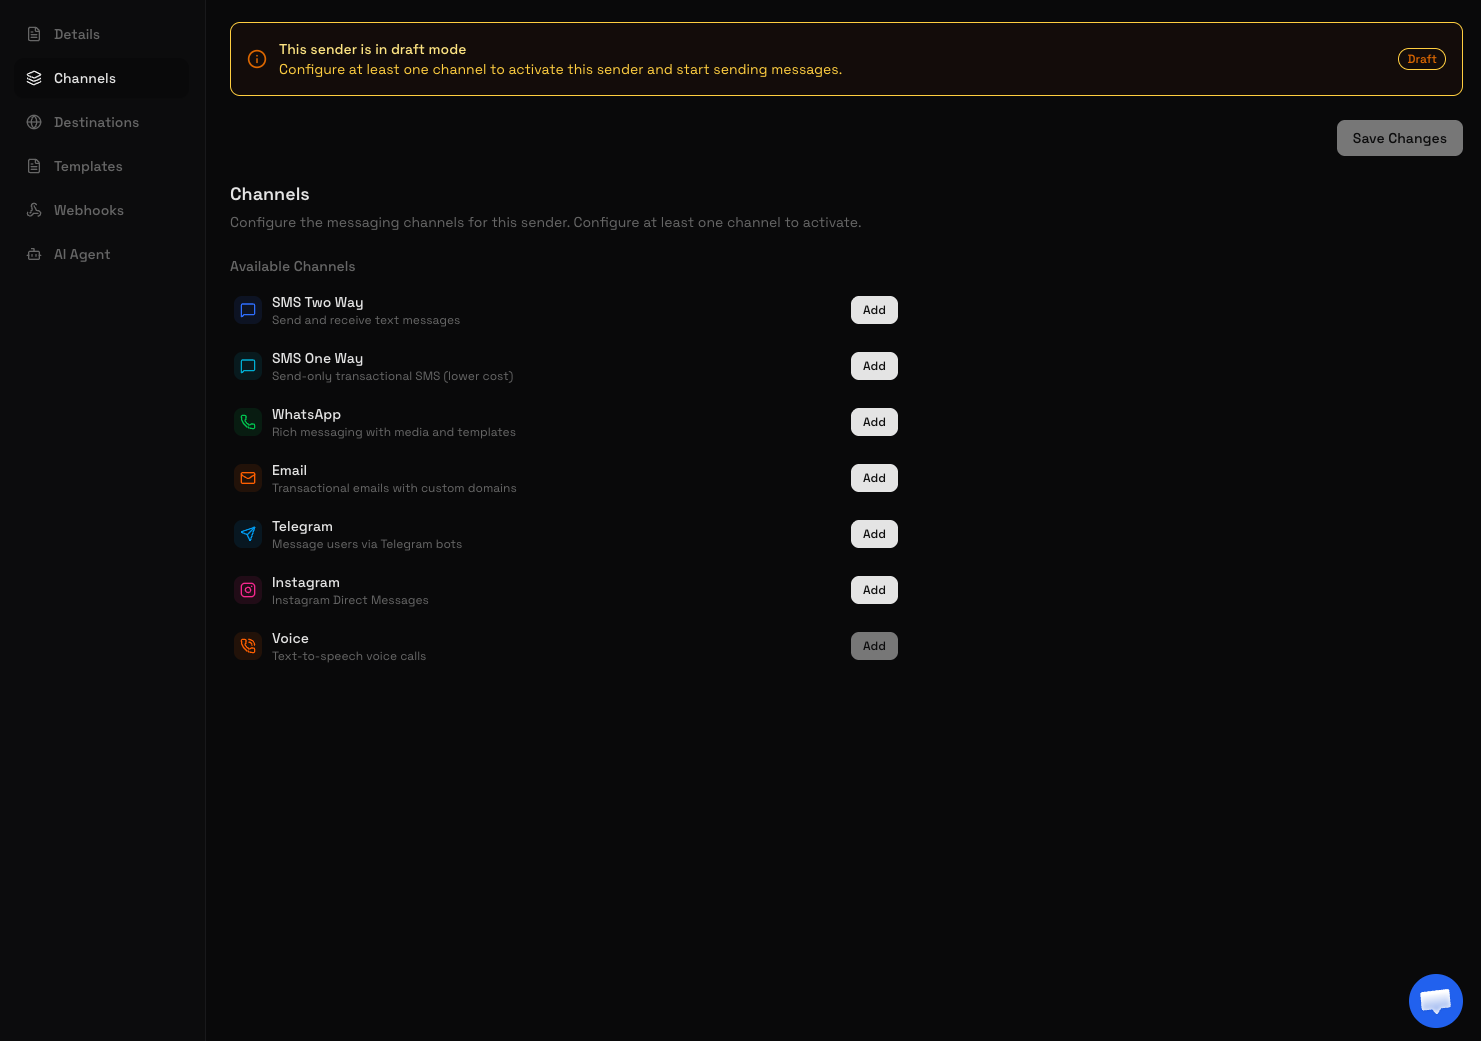 Click the **Email** channel card to open the email configuration dialog. The dialog opens on the **Sandbox (Free)** tab by default. Click **Activate Sandbox Email** to create your sandbox domain.
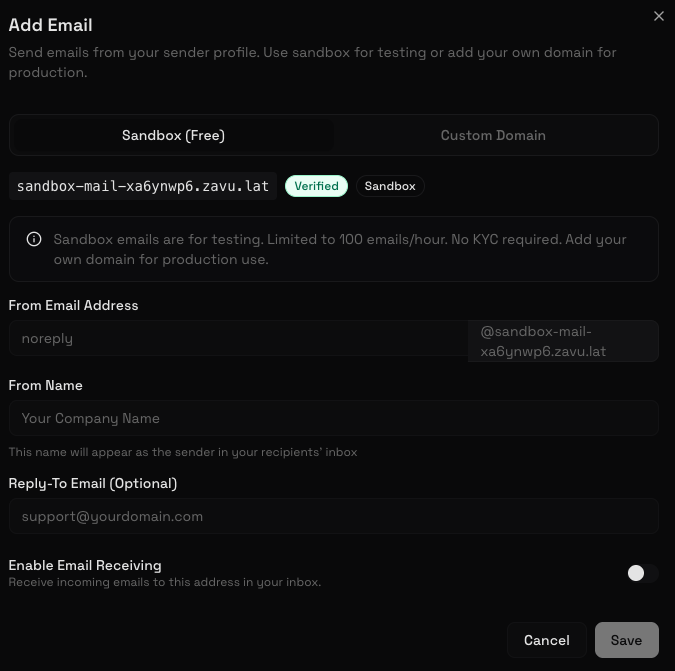 Once the sandbox domain is created, configure:
* **From Email Address**: The local part before `@` (e.g., `noreply`)
* **From Name**: The display name recipients see (e.g., `Your Company`)
* **Reply-To Email** (optional): Where replies go
* **Enable Email Receiving**: Toggle this on if you want to receive inbound emails on this address
Click **Save** to enable the email channel on your sender.
### Send a Test Email
```typescript TypeScript theme={null}
import Zavu from "@zavudev/sdk";
const zavu = new Zavu({ apiKey: process.env.ZAVU_API_KEY });
const result = await zavu.messages.send({
to: "recipient@example.com",
channel: "email",
subject: "Test from Zavu Sandbox",
text: "If you see this, your sandbox email is working!",
});
console.log("Message ID:", result.message.id);
console.log("Status:", result.message.status);
```
```python Python theme={null}
from zavudev import Zavu
zavu = Zavu(api_key="your-api-key")
result = zavu.messages.send(
to="recipient@example.com",
channel="email",
subject="Test from Zavu Sandbox",
text="If you see this, your sandbox email is working!",
)
print(f"Message ID: {result.message.id}")
print(f"Status: {result.message.status}")
```
```ruby Ruby theme={null}
require "zavudev"
client = Zavudev::Client.new(api_key: ENV["ZAVUDEV_API_KEY"])
result = client.messages.send(
to: "recipient@example.com",
channel: "email",
subject: "Test from Zavu Sandbox",
text: "If you see this, your sandbox email is working!"
)
puts "Message ID: #{result.message.id}"
puts "Status: #{result.message.status}"
```
```go Go theme={null}
result, _ := client.Messages.Send(context.TODO(), zavudev.MessageSendParams{
To: zavudev.String("recipient@example.com"),
Channel: zavudev.String("email"),
Subject: zavudev.String("Test from Zavu Sandbox"),
Text: zavudev.String("If you see this, your sandbox email is working!"),
})
fmt.Println("Message ID:", result.Message.ID)
fmt.Println("Status:", result.Message.Status)
```
```php PHP theme={null}
messages->send([
'to' => 'recipient@example.com',
'channel' => 'email',
'subject' => 'Test from Zavu Sandbox',
'text' => 'If you see this, your sandbox email is working!',
]);
echo "Message ID: " . $result->message->id . "\n";
echo "Status: " . $result->message->status . "\n";
```
```bash cURL theme={null}
curl -X POST https://api.zavu.dev/v1/messages \
-H "Authorization: Bearer $ZAVU_API_KEY" \
-H "Content-Type: application/json" \
-d '{
"to": "recipient@example.com",
"channel": "email",
"subject": "Test from Zavu Sandbox",
"text": "If you see this, your sandbox email is working!"
}'
```
If you have multiple senders, use the `Zavu-Sender` header to specify which sender to use. Otherwise, the default sender is used.
### Sandbox vs Custom Domain
| Feature | Sandbox | Custom Domain |
| --------------------- | -------------------------------- | ------------------------------- |
| **Rate limit** | 100 emails/hour | Based on your plan |
| **From address** | `*@yourproject.sandbox.zavu.dev` | `*@yourdomain.com` |
| **Deliverability** | Lower (sandbox reputation) | Higher (your domain reputation) |
| **Inbound receiving** | Supported | Supported (requires MX record) |
| **KYC required** | No | Yes |
***
## Custom Domain Email
For production use, add your own domain to send from addresses like `noreply@yourcompany.com`.
Go to **Sender Profiles** > your sender > **Channels** tab > click the **Email** card.
Click the **Custom Domain** tab at the top of the dialog.
Once the sandbox domain is created, configure:
* **From Email Address**: The local part before `@` (e.g., `noreply`)
* **From Name**: The display name recipients see (e.g., `Your Company`)
* **Reply-To Email** (optional): Where replies go
* **Enable Email Receiving**: Toggle this on if you want to receive inbound emails on this address
Click **Save** to enable the email channel on your sender.
### Send a Test Email
```typescript TypeScript theme={null}
import Zavu from "@zavudev/sdk";
const zavu = new Zavu({ apiKey: process.env.ZAVU_API_KEY });
const result = await zavu.messages.send({
to: "recipient@example.com",
channel: "email",
subject: "Test from Zavu Sandbox",
text: "If you see this, your sandbox email is working!",
});
console.log("Message ID:", result.message.id);
console.log("Status:", result.message.status);
```
```python Python theme={null}
from zavudev import Zavu
zavu = Zavu(api_key="your-api-key")
result = zavu.messages.send(
to="recipient@example.com",
channel="email",
subject="Test from Zavu Sandbox",
text="If you see this, your sandbox email is working!",
)
print(f"Message ID: {result.message.id}")
print(f"Status: {result.message.status}")
```
```ruby Ruby theme={null}
require "zavudev"
client = Zavudev::Client.new(api_key: ENV["ZAVUDEV_API_KEY"])
result = client.messages.send(
to: "recipient@example.com",
channel: "email",
subject: "Test from Zavu Sandbox",
text: "If you see this, your sandbox email is working!"
)
puts "Message ID: #{result.message.id}"
puts "Status: #{result.message.status}"
```
```go Go theme={null}
result, _ := client.Messages.Send(context.TODO(), zavudev.MessageSendParams{
To: zavudev.String("recipient@example.com"),
Channel: zavudev.String("email"),
Subject: zavudev.String("Test from Zavu Sandbox"),
Text: zavudev.String("If you see this, your sandbox email is working!"),
})
fmt.Println("Message ID:", result.Message.ID)
fmt.Println("Status:", result.Message.Status)
```
```php PHP theme={null}
messages->send([
'to' => 'recipient@example.com',
'channel' => 'email',
'subject' => 'Test from Zavu Sandbox',
'text' => 'If you see this, your sandbox email is working!',
]);
echo "Message ID: " . $result->message->id . "\n";
echo "Status: " . $result->message->status . "\n";
```
```bash cURL theme={null}
curl -X POST https://api.zavu.dev/v1/messages \
-H "Authorization: Bearer $ZAVU_API_KEY" \
-H "Content-Type: application/json" \
-d '{
"to": "recipient@example.com",
"channel": "email",
"subject": "Test from Zavu Sandbox",
"text": "If you see this, your sandbox email is working!"
}'
```
If you have multiple senders, use the `Zavu-Sender` header to specify which sender to use. Otherwise, the default sender is used.
### Sandbox vs Custom Domain
| Feature | Sandbox | Custom Domain |
| --------------------- | -------------------------------- | ------------------------------- |
| **Rate limit** | 100 emails/hour | Based on your plan |
| **From address** | `*@yourproject.sandbox.zavu.dev` | `*@yourdomain.com` |
| **Deliverability** | Lower (sandbox reputation) | Higher (your domain reputation) |
| **Inbound receiving** | Supported | Supported (requires MX record) |
| **KYC required** | No | Yes |
***
## Custom Domain Email
For production use, add your own domain to send from addresses like `noreply@yourcompany.com`.
Go to **Sender Profiles** > your sender > **Channels** tab > click the **Email** card.
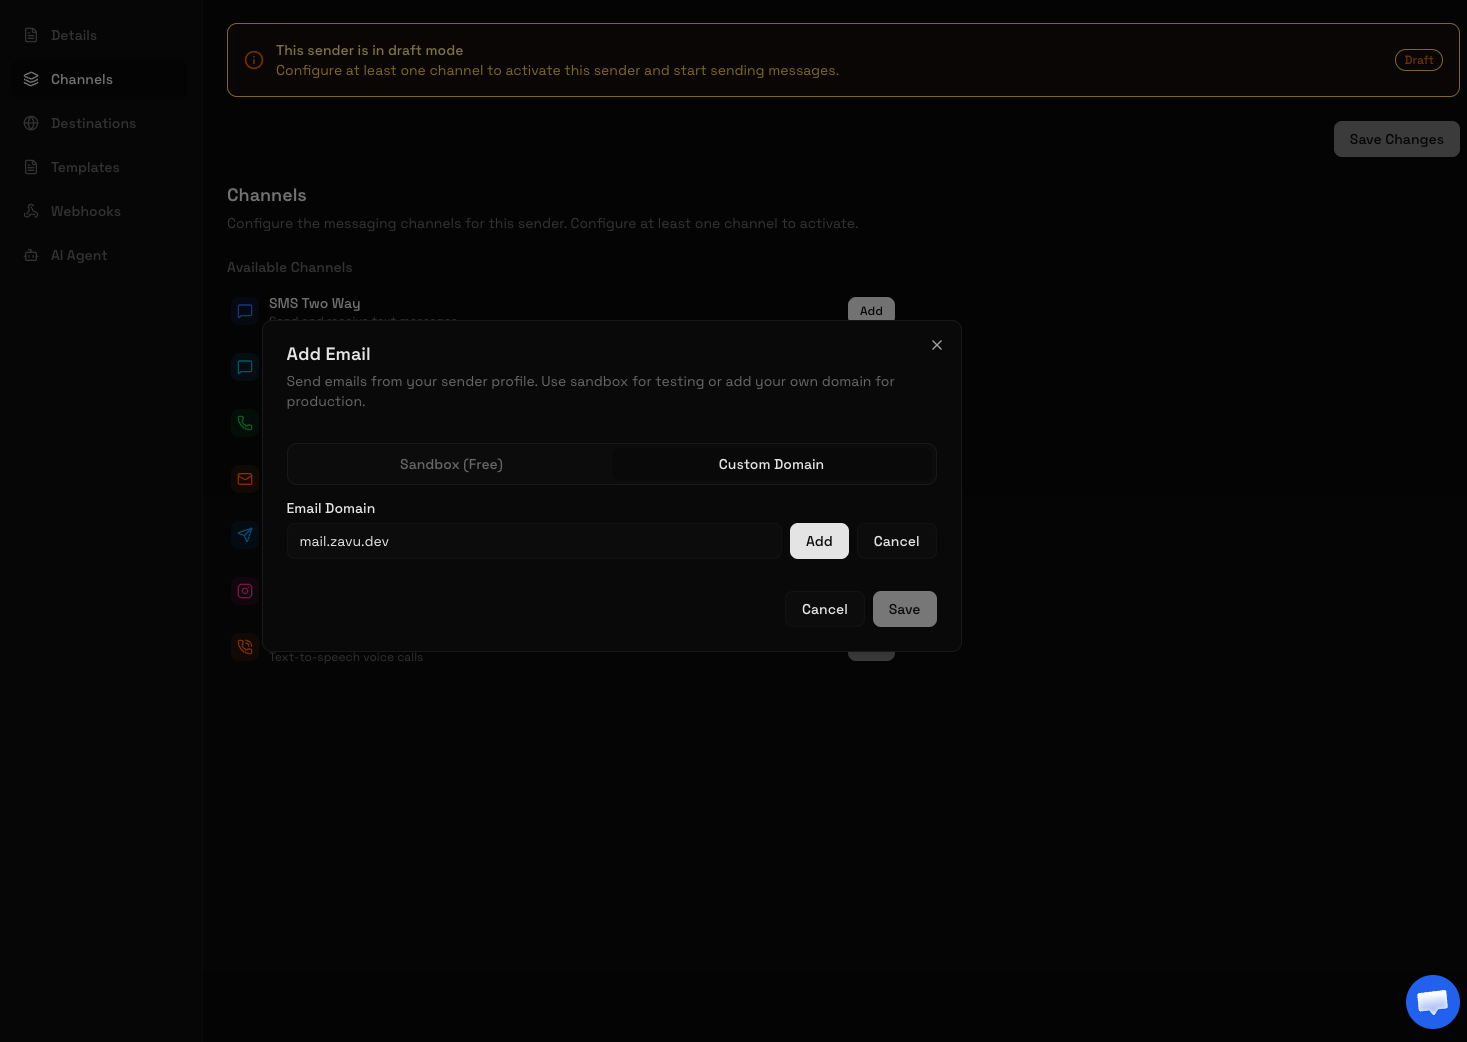
Click the **Custom Domain** tab at the top of the dialog.
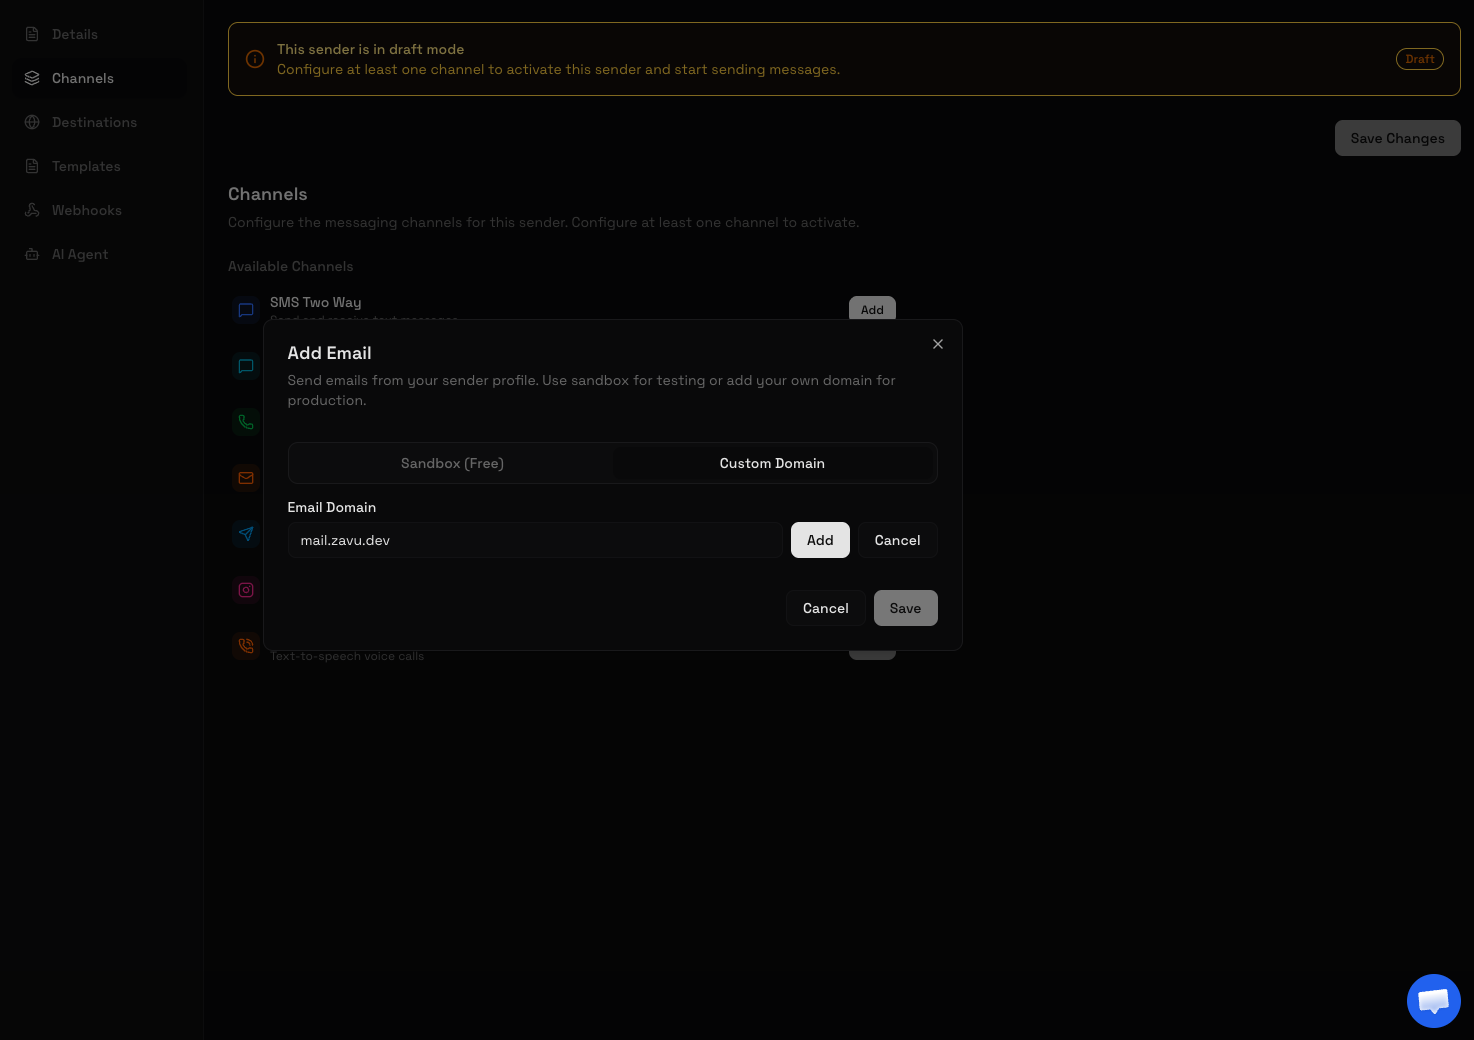 Select **Add new domain** from the dropdown and enter your domain (e.g., `yourcompany.com`).
 Zavu displays the DKIM CNAME records you need to add to your DNS. Copy each record and add them to your DNS provider:
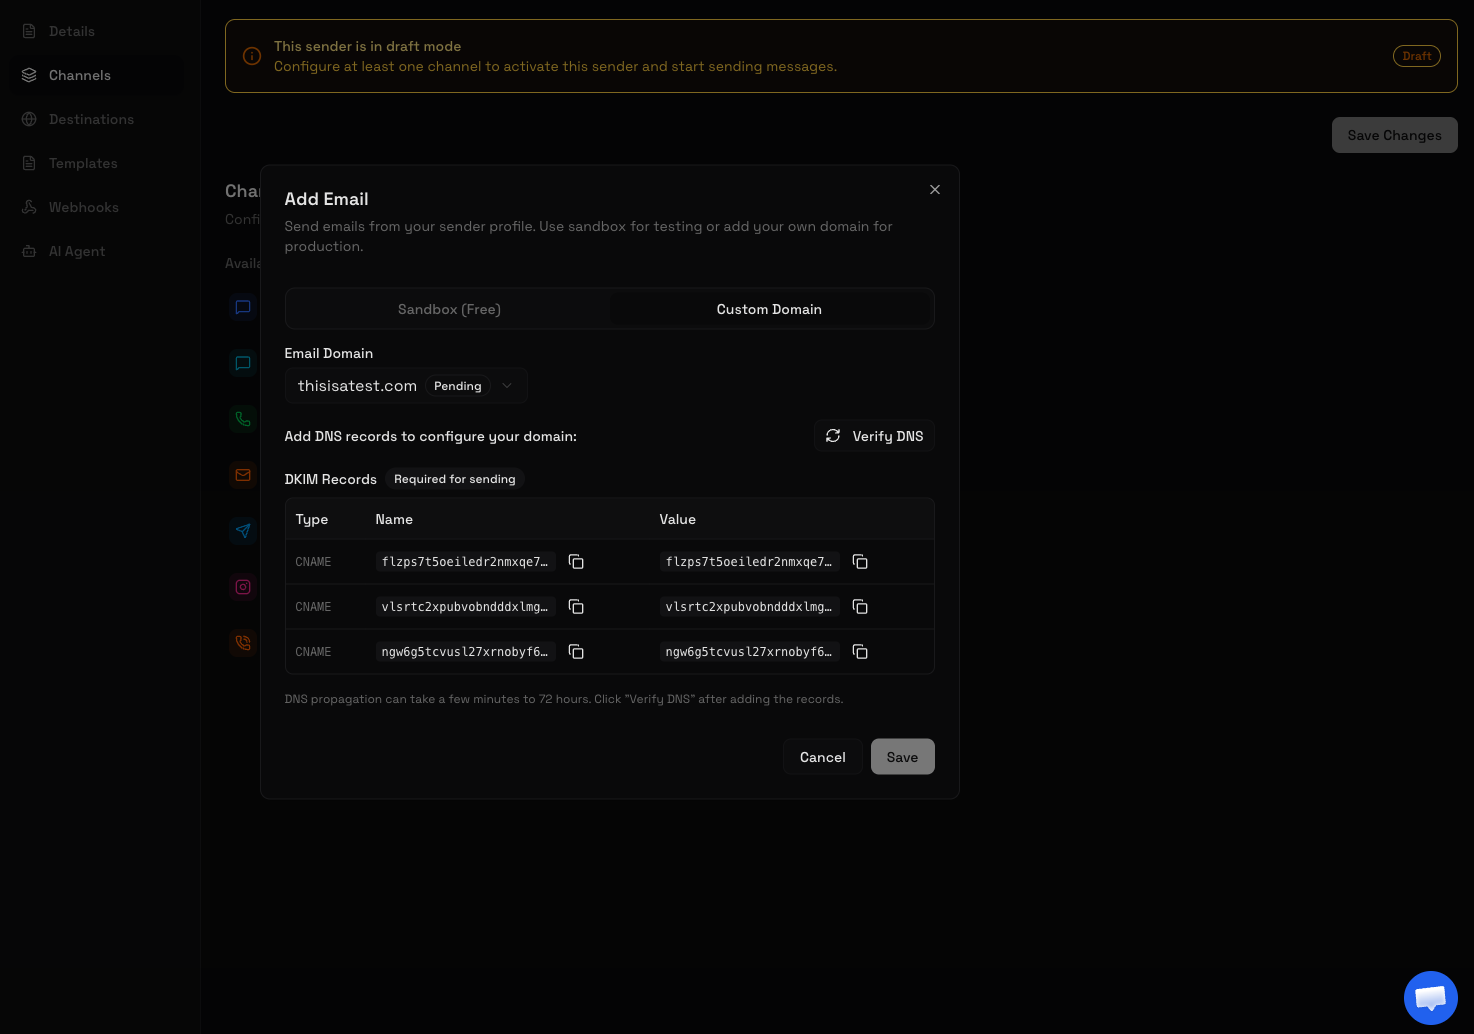 The records look like:
```
selector1._domainkey.yourcompany.com CNAME selector1.dkim.zavu.dev
selector2._domainkey.yourcompany.com CNAME selector2.dkim.zavu.dev
selector3._domainkey.yourcompany.com CNAME selector3.dkim.zavu.dev
```
DNS propagation typically takes a few minutes, but can take up to 72 hours. Use the copy buttons next to each record to avoid typos.
Click **Verify DNS** to check if your records have propagated. Once verified, the domain status changes to **Verified** and the from address fields appear.
Set your:
* **From Email Address**: e.g., `noreply`
* **From Name**: e.g., `Your Company`
* **Reply-To Email** (optional): e.g., `support@yourcompany.com`
Click **Save** to enable the email channel with your custom domain.
Email sending with custom domains requires KYC verification. Complete identity verification in the dashboard before sending production emails.
### Create an email sender via the API
Once a domain is verified (dashboard or above), you can create an email sender programmatically — no phone number required. Set `emailAddress` to a from-address at your verified domain:
```bash cURL theme={null}
curl -X POST https://api.zavu.dev/v1/senders \
-H "Authorization: Bearer $ZAVU_API_KEY" \
-H "Content-Type: application/json" \
-d '{
"name": "Transactional",
"emailAddress": "noreply@yourdomain.com",
"emailFromName": "Your Company",
"setAsDefault": true
}'
```
```typescript TypeScript theme={null}
const sender = await zavu.senders.create({
name: "Transactional",
emailAddress: "noreply@yourdomain.com",
emailFromName: "Your Company",
setAsDefault: true,
});
```
```python Python theme={null}
sender = zavu.senders.create(
name="Transactional",
email_address="noreply@yourdomain.com",
email_from_name="Your Company",
set_as_default=True,
)
```
The address's domain must already be verified in your project. `emailDomainId` is optional — Zavu resolves it from the address. To attach an email address to an **existing** sender instead, `PATCH /v1/senders/{senderId}` with the same `emailAddress` field.
Then send from it — as the default sender, or by passing its ID in the `Zavu-Sender` header:
```bash cURL theme={null}
curl -X POST https://api.zavu.dev/v1/messages \
-H "Authorization: Bearer $ZAVU_API_KEY" \
-H "Content-Type: application/json" \
-d '{ "to": "user@example.com", "channel": "email", "subject": "Hi", "text": "Hello!" }'
```
Passing `from` in the send body does **not** create or select a sender — the from-address comes from the sender's configured `emailAddress`. Create the email sender first (above), then it sends as the default or via `Zavu-Sender`.
***
## Receiving Emails
Zavu can receive inbound emails and deliver them to your application via webhooks. This works for both sandbox and custom domains.
### For Custom Domains: Add MX Record
Go to your sender > **Channels** > **Email** card.
Under **Enable Email Receiving**, Zavu shows the MX record to add to your DNS:
```
yourcompany.com MX 10 inbound.zavu.dev
```
After adding the record, click **Verify MX**. Once verified, the toggle becomes available.
Toggle **Enable Email Receiving** on and save.
### For Sandbox Domains
Toggle **Enable Email Receiving** directly in the sandbox email configuration and save. No MX record needed.
### Set Up Webhook for Inbound Emails
To receive inbound emails in your application, configure a webhook on your sender:
1. Go to your sender > **Webhooks** tab
2. Add your webhook URL and subscribe to the `message.inbound` event
Or via the API:
```typescript TypeScript theme={null}
await zavu.senders.update({
senderId: "sender_abc123",
webhookUrl: "https://api.yourcompany.com/webhooks/zavu",
webhookEvents: ["message.inbound"],
});
```
```python Python theme={null}
zavu.senders.update(
sender_id="sender_abc123",
webhook_url="https://api.yourcompany.com/webhooks/zavu",
webhook_events=["message.inbound"],
)
```
```ruby Ruby theme={null}
client.senders.update(
sender_id: "sender_abc123",
webhook_url: "https://api.yourcompany.com/webhooks/zavu",
webhook_events: ["message.inbound"]
)
```
```go Go theme={null}
client.Senders.Update(context.TODO(), "sender_abc123", zavudev.SenderUpdateParams{
WebhookURL: zavudev.String("https://api.yourcompany.com/webhooks/zavu"),
WebhookEvents: []string{"message.inbound"},
})
```
```php PHP theme={null}
senders->update('sender_abc123', [
'webhookUrl' => 'https://api.yourcompany.com/webhooks/zavu',
'webhookEvents' => ['message.inbound'],
]);
```
```bash cURL theme={null}
curl -X PATCH https://api.zavu.dev/v1/senders/sender_abc123 \
-H "Authorization: Bearer $ZAVU_API_KEY" \
-H "Content-Type: application/json" \
-d '{
"webhookUrl": "https://api.yourcompany.com/webhooks/zavu",
"webhookEvents": ["message.inbound"]
}'
```
When an email is received, Zavu sends a `message.inbound` event:
```json theme={null}
{
"id": "evt_1736850000000_abc123",
"type": "message.inbound",
"timestamp": 1736850000000,
"senderId": "sender_abc123",
"projectId": "proj_xyz789",
"data": {
"messageId": "msg_def456",
"to": "support@yourcompany.com",
"from": "customer@gmail.com",
"channel": "email",
"status": "received",
"subject": "Question about my order",
"text": "Hi, I have a question about order #12345..."
}
}
```
See the [Webhooks guide](/guides/receiving-messages/webhooks) for details on signature verification and security.
### Catch-all: receive every address at your domain
By default a sender only receives email sent to its exact address (e.g. `support@yourcompany.com`). Enable **Catch-all** to receive email addressed to **any** local part at the domain — `sales@`, `billing@`, `hello@`, or an address that doesn't exist as its own sender — all delivered through this one sender's webhook.
Catch-all builds on receiving, so **Enable Email Receiving** must be on (the domain's MX record must be verified). See the steps above.
In the sender's **Channels > Email** dialog, turn on **Catch-all address** and save. The toggle only appears once receiving is enabled.
Every catch-all message fires the same `message.inbound` event. Route sub-addresses yourself using `data.to`, which is always the **original recipient**:
```json theme={null}
{
"type": "message.inbound",
"data": {
"to": "sales@yourcompany.com",
"from": "customer@gmail.com",
"channel": "email",
"subject": "Interested in a demo",
"text": "..."
}
}
```
You can also toggle catch-all from the API with `emailCatchAllEnabled` on the sender:
```bash cURL theme={null}
curl -X PATCH https://api.zavu.dev/v1/senders/sender_abc123 \
-H "Authorization: Bearer $ZAVU_API_KEY" \
-H "Content-Type: application/json" \
-d '{ "emailReceivingEnabled": true, "emailCatchAllEnabled": true }'
```
Catch-all is per sender. Only one sender per domain should have it enabled — it owns all otherwise-unmatched addresses for that domain. Addresses that exactly match another sender still route to that sender. `emailCatchAllEnabled` is ignored unless `emailReceivingEnabled` is also on.
***
## Testing Your Setup
### Verify Sending
1. Send a test email using the code examples above
2. Check the message status in **Messages** in the dashboard
3. Verify the email arrived in the recipient's inbox
### Verify Receiving
1. Send an email to your configured address (e.g., `support@yourcompany.com`)
2. Check your webhook endpoint received the `message.inbound` event
3. Verify the inbound message appears in the dashboard under **Messages**
### Common Issues
| Issue | Cause | Solution |
| ------------------------------------ | -------------------------------------- | --------------------------------------------------------- |
| Email not delivered | Sender has no email channel configured | Add email channel on your sender profile |
| Domain stuck on "Pending" | DNS records not propagated | Wait up to 72 hours, click **Verify DNS** |
| `email_kyc_required` error | KYC not completed | Complete identity verification in dashboard |
| Emails going to spam | Using sandbox domain | Switch to a custom domain for production |
| Inbound not working | MX record missing or not verified | Add MX record and click **Verify MX** |
| Only the exact address receives mail | Catch-all not enabled | Turn on **Catch-all address** in the Email channel dialog |
| Can't toggle receiving | MX record not verified yet | Verify MX record first |
## Next Steps
* [Sending Emails](/guides/sending-messages/email) - API reference for email messages
* [Webhooks](/guides/receiving-messages/webhooks) - Set up webhooks for delivery events
* [Email Health](/guides/email-health/overview) - Monitor bounce rates and deliverability
The records look like:
```
selector1._domainkey.yourcompany.com CNAME selector1.dkim.zavu.dev
selector2._domainkey.yourcompany.com CNAME selector2.dkim.zavu.dev
selector3._domainkey.yourcompany.com CNAME selector3.dkim.zavu.dev
```
DNS propagation typically takes a few minutes, but can take up to 72 hours. Use the copy buttons next to each record to avoid typos.
Click **Verify DNS** to check if your records have propagated. Once verified, the domain status changes to **Verified** and the from address fields appear.
Set your:
* **From Email Address**: e.g., `noreply`
* **From Name**: e.g., `Your Company`
* **Reply-To Email** (optional): e.g., `support@yourcompany.com`
Click **Save** to enable the email channel with your custom domain.
Email sending with custom domains requires KYC verification. Complete identity verification in the dashboard before sending production emails.
### Create an email sender via the API
Once a domain is verified (dashboard or above), you can create an email sender programmatically — no phone number required. Set `emailAddress` to a from-address at your verified domain:
```bash cURL theme={null}
curl -X POST https://api.zavu.dev/v1/senders \
-H "Authorization: Bearer $ZAVU_API_KEY" \
-H "Content-Type: application/json" \
-d '{
"name": "Transactional",
"emailAddress": "noreply@yourdomain.com",
"emailFromName": "Your Company",
"setAsDefault": true
}'
```
```typescript TypeScript theme={null}
const sender = await zavu.senders.create({
name: "Transactional",
emailAddress: "noreply@yourdomain.com",
emailFromName: "Your Company",
setAsDefault: true,
});
```
```python Python theme={null}
sender = zavu.senders.create(
name="Transactional",
email_address="noreply@yourdomain.com",
email_from_name="Your Company",
set_as_default=True,
)
```
The address's domain must already be verified in your project. `emailDomainId` is optional — Zavu resolves it from the address. To attach an email address to an **existing** sender instead, `PATCH /v1/senders/{senderId}` with the same `emailAddress` field.
Then send from it — as the default sender, or by passing its ID in the `Zavu-Sender` header:
```bash cURL theme={null}
curl -X POST https://api.zavu.dev/v1/messages \
-H "Authorization: Bearer $ZAVU_API_KEY" \
-H "Content-Type: application/json" \
-d '{ "to": "user@example.com", "channel": "email", "subject": "Hi", "text": "Hello!" }'
```
Passing `from` in the send body does **not** create or select a sender — the from-address comes from the sender's configured `emailAddress`. Create the email sender first (above), then it sends as the default or via `Zavu-Sender`.
***
## Receiving Emails
Zavu can receive inbound emails and deliver them to your application via webhooks. This works for both sandbox and custom domains.
### For Custom Domains: Add MX Record
Go to your sender > **Channels** > **Email** card.
Under **Enable Email Receiving**, Zavu shows the MX record to add to your DNS:
```
yourcompany.com MX 10 inbound.zavu.dev
```
After adding the record, click **Verify MX**. Once verified, the toggle becomes available.
Toggle **Enable Email Receiving** on and save.
### For Sandbox Domains
Toggle **Enable Email Receiving** directly in the sandbox email configuration and save. No MX record needed.
### Set Up Webhook for Inbound Emails
To receive inbound emails in your application, configure a webhook on your sender:
1. Go to your sender > **Webhooks** tab
2. Add your webhook URL and subscribe to the `message.inbound` event
Or via the API:
```typescript TypeScript theme={null}
await zavu.senders.update({
senderId: "sender_abc123",
webhookUrl: "https://api.yourcompany.com/webhooks/zavu",
webhookEvents: ["message.inbound"],
});
```
```python Python theme={null}
zavu.senders.update(
sender_id="sender_abc123",
webhook_url="https://api.yourcompany.com/webhooks/zavu",
webhook_events=["message.inbound"],
)
```
```ruby Ruby theme={null}
client.senders.update(
sender_id: "sender_abc123",
webhook_url: "https://api.yourcompany.com/webhooks/zavu",
webhook_events: ["message.inbound"]
)
```
```go Go theme={null}
client.Senders.Update(context.TODO(), "sender_abc123", zavudev.SenderUpdateParams{
WebhookURL: zavudev.String("https://api.yourcompany.com/webhooks/zavu"),
WebhookEvents: []string{"message.inbound"},
})
```
```php PHP theme={null}
senders->update('sender_abc123', [
'webhookUrl' => 'https://api.yourcompany.com/webhooks/zavu',
'webhookEvents' => ['message.inbound'],
]);
```
```bash cURL theme={null}
curl -X PATCH https://api.zavu.dev/v1/senders/sender_abc123 \
-H "Authorization: Bearer $ZAVU_API_KEY" \
-H "Content-Type: application/json" \
-d '{
"webhookUrl": "https://api.yourcompany.com/webhooks/zavu",
"webhookEvents": ["message.inbound"]
}'
```
When an email is received, Zavu sends a `message.inbound` event:
```json theme={null}
{
"id": "evt_1736850000000_abc123",
"type": "message.inbound",
"timestamp": 1736850000000,
"senderId": "sender_abc123",
"projectId": "proj_xyz789",
"data": {
"messageId": "msg_def456",
"to": "support@yourcompany.com",
"from": "customer@gmail.com",
"channel": "email",
"status": "received",
"subject": "Question about my order",
"text": "Hi, I have a question about order #12345..."
}
}
```
See the [Webhooks guide](/guides/receiving-messages/webhooks) for details on signature verification and security.
### Catch-all: receive every address at your domain
By default a sender only receives email sent to its exact address (e.g. `support@yourcompany.com`). Enable **Catch-all** to receive email addressed to **any** local part at the domain — `sales@`, `billing@`, `hello@`, or an address that doesn't exist as its own sender — all delivered through this one sender's webhook.
Catch-all builds on receiving, so **Enable Email Receiving** must be on (the domain's MX record must be verified). See the steps above.
In the sender's **Channels > Email** dialog, turn on **Catch-all address** and save. The toggle only appears once receiving is enabled.
Every catch-all message fires the same `message.inbound` event. Route sub-addresses yourself using `data.to`, which is always the **original recipient**:
```json theme={null}
{
"type": "message.inbound",
"data": {
"to": "sales@yourcompany.com",
"from": "customer@gmail.com",
"channel": "email",
"subject": "Interested in a demo",
"text": "..."
}
}
```
You can also toggle catch-all from the API with `emailCatchAllEnabled` on the sender:
```bash cURL theme={null}
curl -X PATCH https://api.zavu.dev/v1/senders/sender_abc123 \
-H "Authorization: Bearer $ZAVU_API_KEY" \
-H "Content-Type: application/json" \
-d '{ "emailReceivingEnabled": true, "emailCatchAllEnabled": true }'
```
Catch-all is per sender. Only one sender per domain should have it enabled — it owns all otherwise-unmatched addresses for that domain. Addresses that exactly match another sender still route to that sender. `emailCatchAllEnabled` is ignored unless `emailReceivingEnabled` is also on.
***
## Testing Your Setup
### Verify Sending
1. Send a test email using the code examples above
2. Check the message status in **Messages** in the dashboard
3. Verify the email arrived in the recipient's inbox
### Verify Receiving
1. Send an email to your configured address (e.g., `support@yourcompany.com`)
2. Check your webhook endpoint received the `message.inbound` event
3. Verify the inbound message appears in the dashboard under **Messages**
### Common Issues
| Issue | Cause | Solution |
| ------------------------------------ | -------------------------------------- | --------------------------------------------------------- |
| Email not delivered | Sender has no email channel configured | Add email channel on your sender profile |
| Domain stuck on "Pending" | DNS records not propagated | Wait up to 72 hours, click **Verify DNS** |
| `email_kyc_required` error | KYC not completed | Complete identity verification in dashboard |
| Emails going to spam | Using sandbox domain | Switch to a custom domain for production |
| Inbound not working | MX record missing or not verified | Add MX record and click **Verify MX** |
| Only the exact address receives mail | Catch-all not enabled | Turn on **Catch-all address** in the Email channel dialog |
| Can't toggle receiving | MX record not verified yet | Verify MX record first |
## Next Steps
* [Sending Emails](/guides/sending-messages/email) - API reference for email messages
* [Webhooks](/guides/receiving-messages/webhooks) - Set up webhooks for delivery events
* [Email Health](/guides/email-health/overview) - Monitor bounce rates and deliverability